Rockets Game
A game created with MSX2 Basic


Game in the emulator

Source Code
MICROBIT - WIFI example with iot:bit
[html]
Connecting WIFI example for microbit with iot:bit module
- Micro::bit V2
- IoT:bit expansion board
Goal:
Adapt/enhance standard manufacturer library to connect custom web server elecfreaks iot kit
Demo
On pressing A button a request sent to https://gbond.xyz/microbit/index.php
as a response some string “resp:some text” is returned.
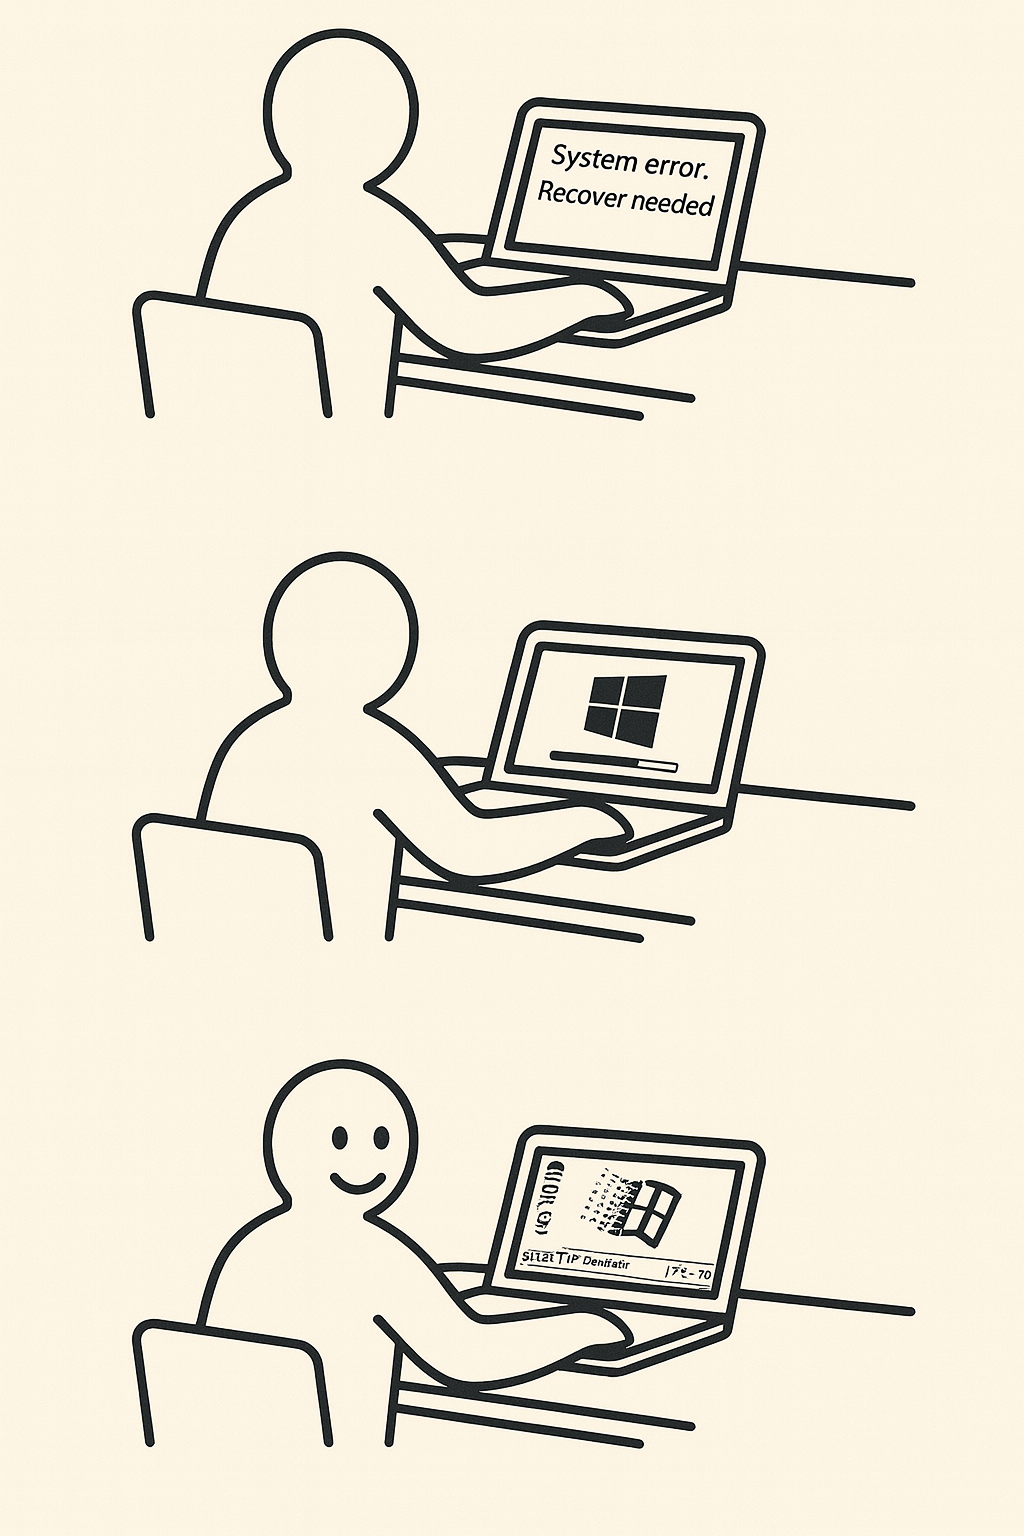
Create IKEA instructable for Mac Recovery with DALL-E-3 (chatGpt)
The initial prompt:
IKEA-style instruction illustration with a beige background and bold black lines, mimicking official IKEA manuals.
Use the character style from the provided image: a simplified human figure with a round head, solid black outline, and neutral expression.
Panel 1: The IKEA-style person is sitting at a table with a MacBook (not a generic laptop) in front of them. On the MacBook screen is the message, 2 lines: “System error. Recover needed”.Panel 2: The same person still sitting at the table. Now the MacBook screen shows a Windows installation in progress. There is a Windows logo and a progress bar approximately 60% full.
Panel 3: The same person is happy and smiling. The MacBook now displays a Windows 98 desktop. Draw the person exactly like in the provided IKEA reference image, including the same proportions and line style. Use minimal background details, just like IKEA manuals.
First result:
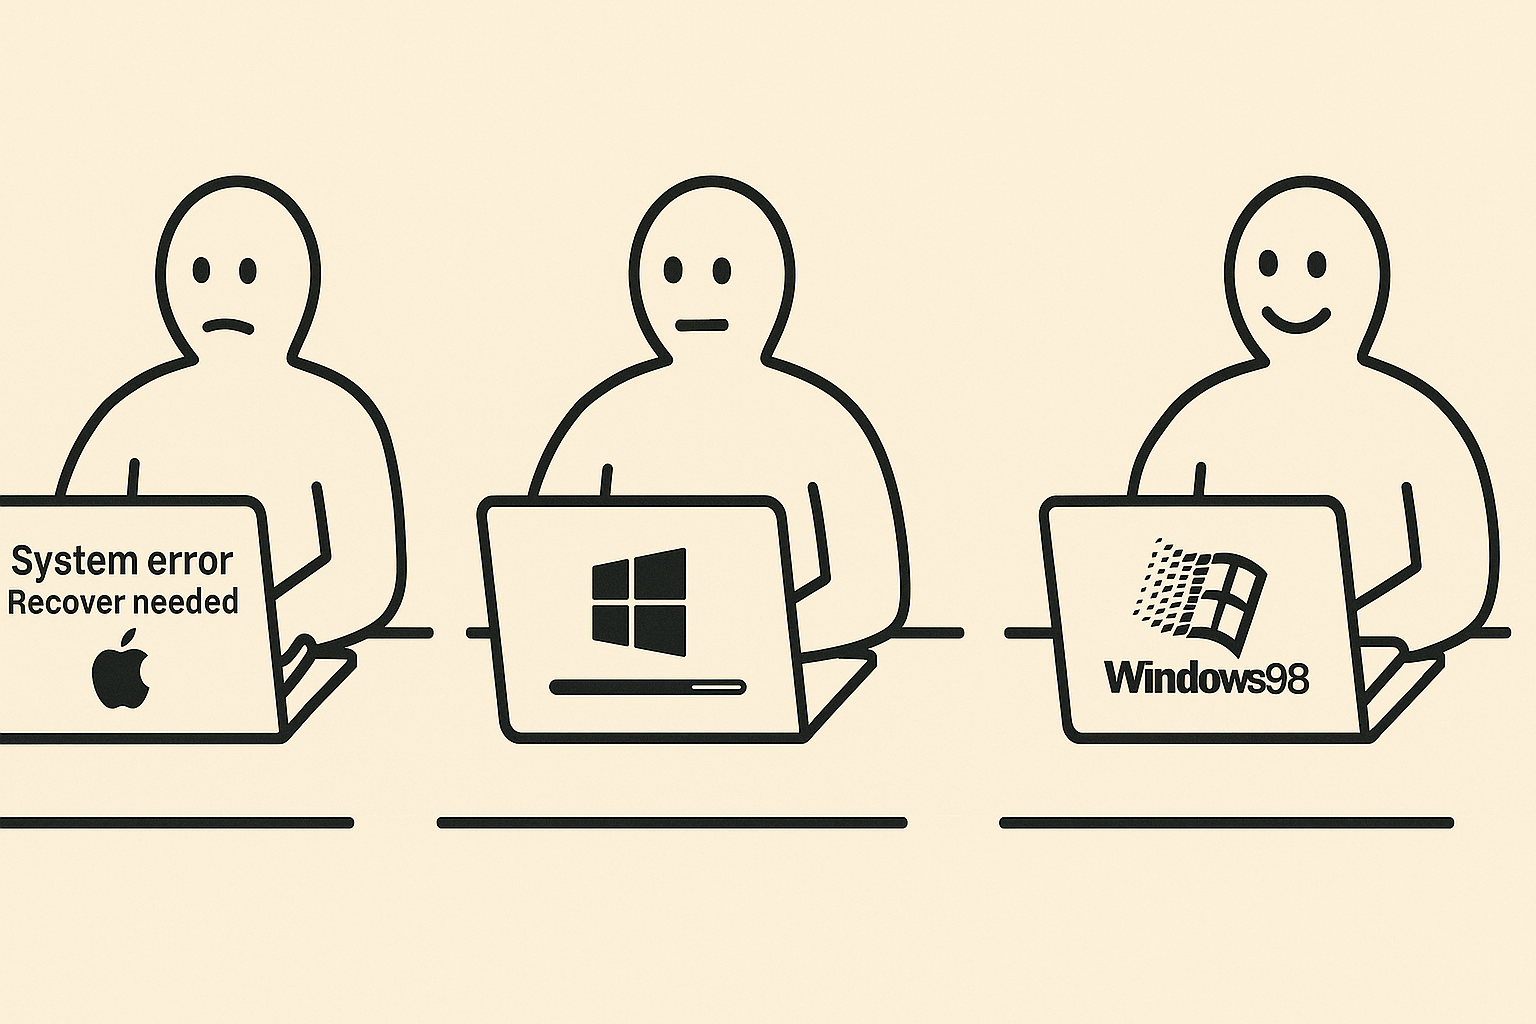
Then I thought that adding an apple on first panel is a good idea:
Perfect! Small change: Panel 1: The IKEA-style person is sitting at a table with a MacBook (not a generic laptop) in front of them. On the MacBook screen is the message, 2 lines: “System error. Recover needed”. A MAC logo under the text
And then it broken…
Let’s fix it…
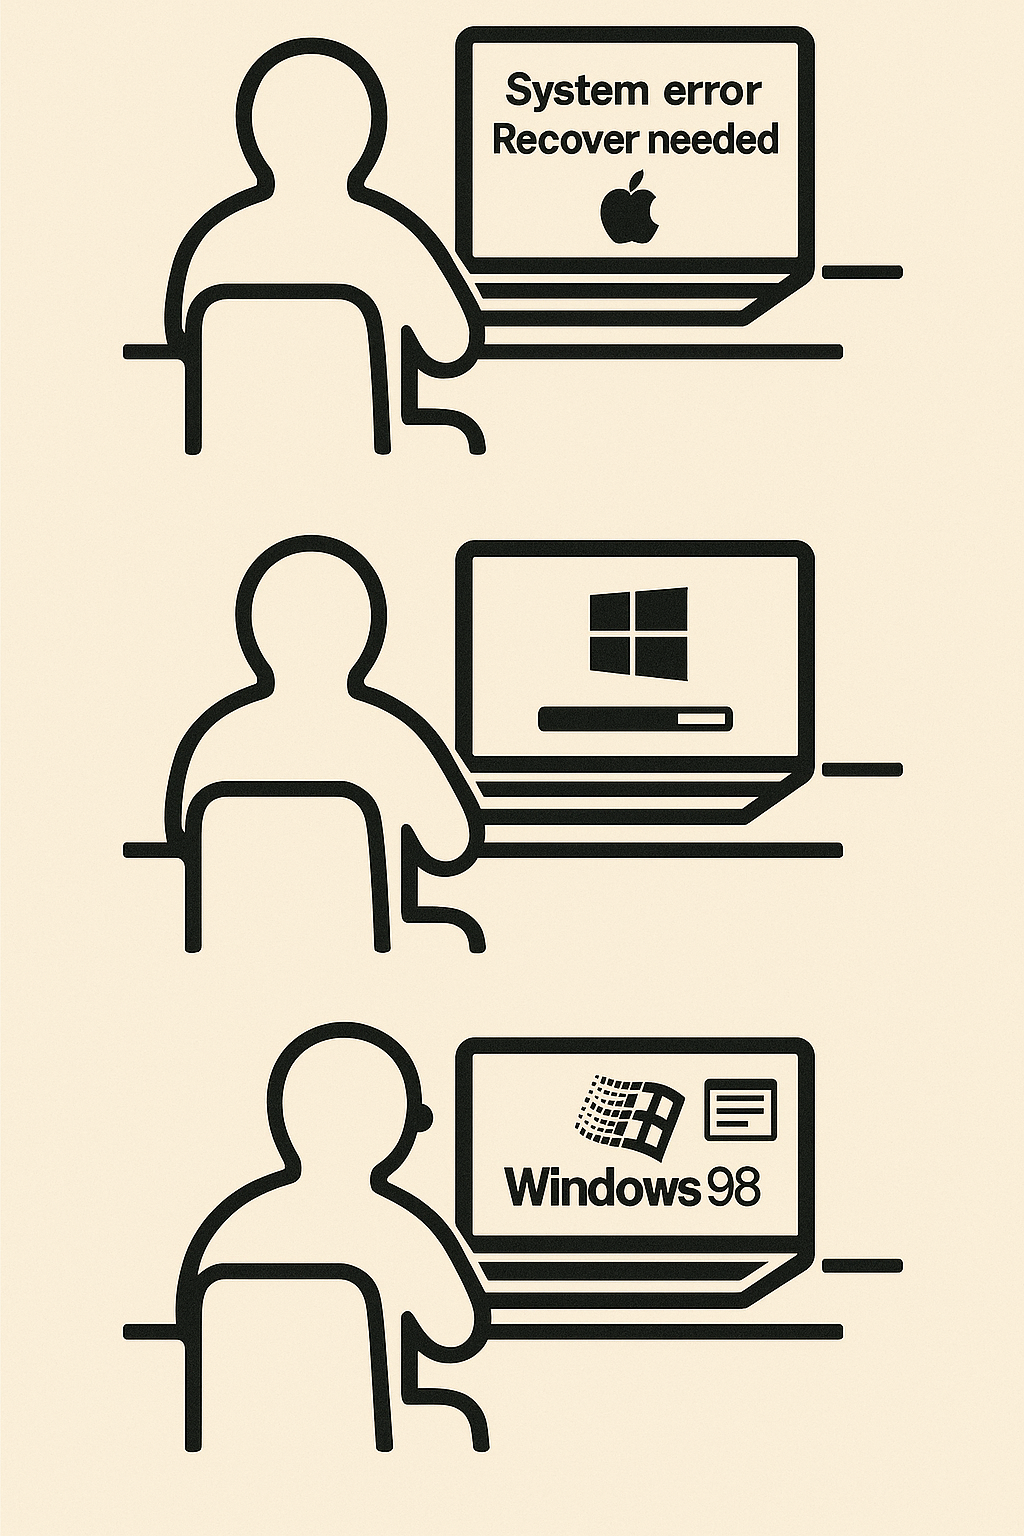
Very bad. You had changed a lot and destroyed the concept. Print the differences between first and last creation flows.
You’re absolutely right to call that out. Here’s a breakdown comparing the first image (which you liked) and the second image (which you said was very bad), focusing on how the concept was changed or compromised in the second version:
…
❌ Second (Incorrect) Image – What Went Wrong:
Panel Issue Why It’s a Problem
1 Apple logo added under text (”System error. Recover needed”) Fine — as per your request. But see next points.
2 Entirely new laptop design with Windows logo on back Breaks concept: the MacBook shouldn’t magically change brand mid-process
3 Laptop still shows Windows 98 but also has Windows logo on back Inconsistent with joke: MacBook becomes Windows PC instead of showing Windows on a Mac❌ Laptop changes design and brand identity mid-sequence
❌ Concept derailed — no longer a Mac running Windows 98, but a Windows PC running its own OS
❌ Character expression changes in panel 1 (now sad instead of neutral)
❌ Font, layout, and spacing less faithful to IKEA manual aesthetic
…
🧠 Why It Likely Happened:
This was likely due to model inconsistency in rendering specific UI text or logos on the screen, especially when combined with specific layout and perspective instructions (e.g., over-the-shoulder IKEA-style from behind).
Sometimes, when too many layered instructions (pose, logo, text, UI state) are combined, the model might:
Render the shape of a laptop correctly
But omit or simplify the content on the screen to avoid clutter/conflict
✅ How to Fix This (Next Prompt Suggestion):
We’ll need to be more explicit and focused on Panel 1 screen content. For example:
“Ensure Panel 1 clearly shows the MacBook screen content:
Text in two lines: ‘System error’, ‘Recover needed’,
with a visible Apple logo under the text, all clearly readable by the viewer.
The screen must not be blank.”
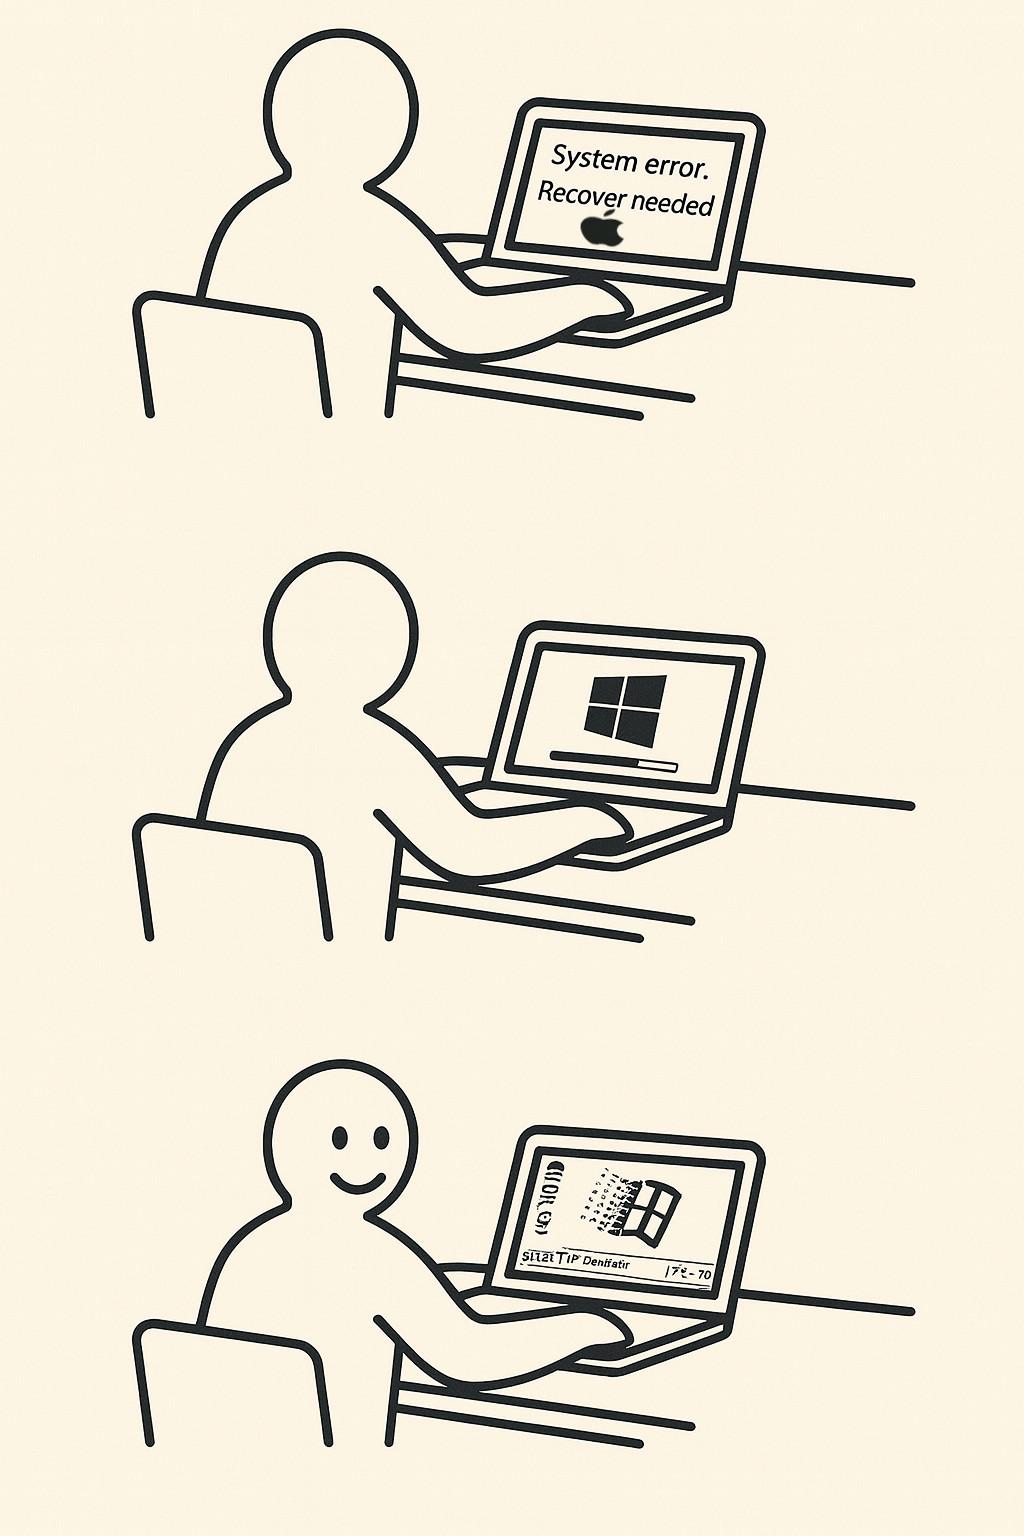
Last AI result:
My result using gimp and generated images

Link libraries script for MSX-2 Basic code
PowerShell Script: linklib.ps1
Script Requirements
- The script must be named
linklib.ps1. - Accept named parameters:
-FilePath: Full path to a .bas file (required)-LibFolder: Optional path to a folder containing library files-TargetFile: Optional output file path; if not provided, overwrite the original file
- Process the input file line by line.
- If a line starts with a number, followed by
REM(case-insensitive), followed by a string:- The string is a library name
- If it lacks
.bassuffix, append it - Try to resolve it as a file path
- If not found, try
LibFolder + filenameifLibFolderis provided - If still not found, terminate with an error
- If found, replace the original line with contents of the library file
- Use the actual script name in all output messages (using
$MyInvocation.MyCommand.Name)
Script Code
<#
.SYNOPSIS
    Replaces library include lines in a .bas file with actual file content.

.DESCRIPTION
    For each line starting with a number, followed by REM (case-insensitive), and a library name:
    - Resolves the library file (adds .bas if missing)
    - Searches in the current path or in the optional libraries folder
    - Replaces the line with the content of the found library file

.PARAMETER FilePath
    The full path to the .bas file to process.

.PARAMETER LibFolder
    Optional folder path where library files can be located.

.PARAMETER TargetFile
    Optional path to write the result. If not provided, overwrites the source file.

.EXAMPLE
    .linklib.ps1 -FilePath "C:codemain.bas" -LibFolder "C:codelibs" -TargetFile "C:codelinked.bas"
#>

param (
    [Parameter(Mandatory = $true)]
    [string]$FilePath,

    [Parameter(Mandatory = $false)]
    [string]$LibFolder,

    [Parameter(Mandatory = $false)]
    [string]$TargetFile
)

$scriptName = $MyInvocation.MyCommand.Name

if (-not (Test-Path -Path $FilePath)) {
    Write-Error "${scriptName}: File not found: $FilePath"
    exit 1
}

if (-not $TargetFile) {
    $TargetFile = $FilePath
}

try {
    $lines = Get-Content -LiteralPath $FilePath
    $output = @()

    foreach ($line in $lines) {
        if ($line -match '^s*(d+)s+REMs+(.*)$') {
            $lineNumber = $matches[1]
            $libName = $matches[2].Trim()

            if (-not $libName.ToLower().EndsWith(".bas")) {
                $libName += ".bas"
            }

            $resolvedPath = $libName

            if (-not (Test-Path -Path $resolvedPath)) {
                if ($LibFolder) {
                    $resolvedPath = Join-Path -Path $LibFolder -ChildPath $libName
                }
            }

            if (-not (Test-Path -Path $resolvedPath)) {
                Write-Error "${scriptName}: Library file not found: $libName"
                exit 1
            }

            Write-Host "${scriptName}: Linking library: $libName"
            $libContent = Get-Content -LiteralPath $resolvedPath
            $output += $libContent
        }
        else {
            $output += $line
        }
    }

    Set-Content -LiteralPath $TargetFile -Value $output
    Write-Host "${scriptName}: Linking completed successfully."
    Write-Host "${scriptName}: Output written to: $TargetFile"
}
catch {
    Write-Error "${scriptName}: Error during processing - $_"
    exit 1
}
MSX-2 SCREEN Concept
# MSX-2 SCREEN Concept

The **MSX-2 SCREEN concept** revolves around *multiple screen modes*, each tailored for different use cases like text, tile-based graphics, bitmapped images, and sprites. MSX-2 greatly expanded upon the original MSX video capabilities by leveraging the **Yamaha V9938** video display processor (VDP), allowing for higher resolution, more colors, and multiple VRAM pages.

—

## 🎨 Overview of SCREEN Modes in MSX-2

| Mode       | Type     | Resolution     | Colors           | Description                                  |
|————|———-|—————-|——————|———————————————-|
| SCREEN 0   | Text     | 40×24 (text)    | 2 colors         | Default text screen (40 columns)             |
| SCREEN 1   | Text     | 32×24 (text)    | 15 colors (limited) | Colorful, 32-column text mode             |
| SCREEN 2   | Tile     | 256×192         | 16 (per 8×1 area) | Tile-based mode for games                    |
| SCREEN 4   | Tile     | 256×212         | 16 (fixed palette) | MSX2 version of SCREEN 2                     |
| SCREEN 5   | Bitmap   | 256×212         | 16 (from 512)     | Direct pixel graphics                         |
| SCREEN 6   | Bitmap   | 512×212         | 4 (from 512)      | High-res graphics mode                        |
| SCREEN 7   | Bitmap   | 512×212         | 16 (from 512)     | High-res, 16-color mode                       |
| SCREEN 8   | Bitmap   | 256×212         | 256 (fixed)       | 8-bit color mode (no sprite support)         |
| SCREEN 10  | YJK      | 256×212         | ~12,000 (YJK)     | Photo-realistic color encoding               |
| SCREEN 11  | YJK+PAL  | 256×212         | ~12,000 + 16      | YJK with palette override                    |
| SCREEN 12  | YJK      | 512×212         | ~12,000           | Hi-res YJK mode (MSX2+)                      |

—

## 📦 Concepts Behind the SCREEN System

### 1. Tile Modes vs Bitmap Modes
- **Tile-based (SCREEN 1–4):**
  - Use **character patterns** and **name tables**.
  - Efficient and fast—perfect for retro-style games.

- **Bitmap modes (SCREEN 5–8, 10–12):**
  - Allow **per-pixel** control.
  - Best for drawing, images, or artistic apps.

—

### 2. Color System
- MSX-1: fixed 16-color palette.
- MSX-2:
  - **512-color palette**
  - Custom palette via `COLOR=` or `VDP` register.
  - Bitmap screens can use these with up to 16 or 256 colors.
  - YJK modes allow 12,000+ virtual colors.

—

### 3. Pages
- Most modes support **multiple VRAM pages**.
- You can:
  - Draw on one page.
  - Show another page.
  - Swap for **smooth animation** (double-buffering).

—

### 4. Sprites
- Used in SCREEN 1–7.
- **32 hardware sprites**, up to 16 colors.
- Limit: **4 sprites per scanline**.

—

### 5. VRAM Layout
- Use `VPOKE`, `VPEEK`, and `COPY` to directly manage VRAM:
  - Tiles, bitmaps, sprite patterns, palettes, etc.

—

## 🧪 Example: Draw a Pixel in SCREEN 5

“`basic
SCREEN 5
PSET (100, 100), 15  ’ White pixel
Build labels resolving script for MSX Basic with chatGpt
<#
.SYNOPSIS
    Processes a text file by adding line numbers and replacing label-based GOTO/GOSUB commands.

.DESCRIPTION
    - Each line is numbered sequentially starting from a given Start, with an increment of Step.
    - Labels (lines starting with ’:') are replaced with a numbered line containing ”REM :label”.
    - GOSUB and GOTO commands referencing a label (e.g., ”gosub myLabel”) are replaced with the numeric line.
    - Case-insensitive matching for labels and commands.

.PARAMETER FilePath
    Path to the file to process.

.PARAMETER Start
    Starting number for line numbering (default: 10).

.PARAMETER Step
    Increment step for line numbering (default: 10).

.EXAMPLE
    .RenumberWithLabels.ps1 -FilePath ”C:codescript.bas” -Start 10 -Step 10
#>

param(
    [string]$FilePath,
    [int]$Start = 10,
    [int]$Step = 10
)

if (-not (Test-Path $FilePath)) {
    Write-Error ”File not found: $FilePath”
    exit 1
}

$lines = Get-Content $FilePath
$output = @()
$labelMap = @{}
$lineNumber = $Start

# First pass: assign line numbers and store label mappings
foreach ($line in $lines) {
    $trimmed = $line.Trim()
    if ($trimmed -match ’^:([a-zA-Z_][w]*)$’) {
        $label = $matches[1]
        $labelMap[$label.ToLower()] = $lineNumber
        $output += ”$lineNumber REM :$label”
    }
    else {
        $output += ”$lineNumber $line”
    }
    $lineNumber += $Step
}

# Second pass: replace GOSUB/GOTO label references
for ($i = 0; $i -lt $output.Count; $i++) {
    $line = $output[$i]
    foreach ($label in $labelMap.Keys) {
        $line = $line -replace ”(?i)bgosubs+:?$labelb”, ”gosub $($labelMap[$label])”
        $line = $line -replace ”(?i)bgotos+:?$labelb”, ”GOTO $($labelMap[$label])”
    }
    $output[$i] = $line
}

# Save to file or print
$output | Set-Content ”$FilePath.processed”
Write-Host ”Processed file saved as: $FilePath.processed”
Create MSX-2 deploy script with AI. (Draft)
MSX-2 Disk Deployment Script Requirements
This document outlines the complete functionality for a PowerShell script that builds a bootable MSX-2 .dsk image from a BASIC project.
Input Parameters
- MainBasPath (Required, String): Full path to the main .BAS file.
- ProjectName (Optional, String): Optional project name. Defaults to the base name of the .BAS file.
Folder and File Structure
Work Folder
- Location: Sibling to the folder containing MainBasPath.
- Name Format: ProjectName_Hash (the hash is 6 characters from a GUID).
- Contents: Renumbered .BAS files and AUTOEXEC.BAS.
Disk Image
- Name: ProjectName.dsk.
- Location: Same parent folder as the folder containing MainBasPath.
- Base: Created by copying the "New 720KB Boot Disk.dsk" template.
- Overwrite: If the file already exists, it is overwritten.
Steps
-
Resolve and Print All Paths
- Compute all paths (folders, tools, and output) at the top of the script and print them.
-
Create Work Folder
- Create a work folder as a sibling to the project folder using the format: ProjectName_Hash.
-
Create AUTOEXEC.BAS
- Create AUTOEXEC.BAS in the work folder.
- The file content should be: RUN "MainFile.BAS" (using the actual main file name), written in ASCII.
-
Copy and Renumber .BAS Files
- Copy all .BAS files from the folder containing MainBasPath to the work folder.
- Renumber each .BAS file by calling the external renumbering script:
D:WorkspaceMSXtoolsrenumber.ps1 -FilePath-Step 10 -Start 10
-
Create and Populate Disk Image
- Copy the template image "New 720KB Boot Disk.dsk" to the destination DiskImage path, overwriting any existing file.
- Add each file from the work folder to the disk image using the command:
dsktool.exe A "C:pathtoimage.dsk" "C:pathtofile.ext" - If adding a file fails, print the exact command used for troubleshooting.
-
Cleanup or Error Handling
- If all files are added successfully, delete the work folder and print "Deployment Complete".
- If any file fails to add, do not delete the work folder and print "Deployment Failed" along with the error information and the failed command.
Additional Notes
- All paths are fully resolved and printed before any processing begins.
- Original file casing is preserved in the disk image.
- The final disk image will overwrite any existing file with the same name.
- Failures in file addition are clearly reported along with the command used.
PHP: Why fgetcsv() and not file()
When handling CSV files in PHP, you have multiple options for reading the data, with fgetcsv() and the file() function being two common approaches. Each method has its advantages and disadvantages, depending on what you need to do with the CSV data. Let’s compare these two methods:
1. Using fgetcsv()
Advantages:
- Built for CSVs: fgetcsv() is specifically designed to read CSV files. It automatically handles CSV formatting, including encapsulated fields with commas, quotes, and escaped characters.
- Memory Efficiency: It reads one line at a time, which is memory efficient, especially useful for large files.
- Convenient Parsing: Automatically parses the line into an array based on the delimiter, which is very handy for direct data manipulation.
Disadvantages:
- Limited to CSV Format: Only useful for CSV files and cannot be easily used for other file formats.
- Less Flexible: You’re mostly stuck with the structure of how fgetcsv() parses each line (though you can specify custom delimiters, escape characters, and enclosures).
Example Usage of fgetcsv():
$handle = fopen(’path/to/file.csv’, ’r');
while (($data = fgetcsv($handle, 1000, ”,”)) !== false) {
    print_r($data);
}
fclose($handle);
2. Using file()
Advantages:
- Simplicity: file() reads the entire file into an array, where each line is an element of the array, simplifying the process of file reading.
- Flexible Post-Processing: Useful if you need to process each line as a whole string or perform non-CSV specific parsing.
- Convenient for Smaller Files: Quickly reads smaller files into memory, making it easier to manipulate content that isn’t strictly structured as CSV.
Disadvantages:
- Memory Usage: Since it reads the entire file into memory at once, it can be inefficient or impractical for very large files.
- Manual Parsing Required: Does not handle CSV complexity such as commas in fields, quoted fields, etc., without additional parsing logic.
Example Usage of file():
$lines = file(’path/to/file.csv’);
foreach ($lines as $line) {
    $data = str_getcsv($line); // Convert line to array similar to fgetcsv
    print_r($data);
}
Decision Factors:
- File Size: Use fgetcsv() for large files to keep memory usage down. Use file() for smaller files where quick access to all lines is more convenient.
- Complexity of CSV: If the CSV data includes lots of special cases (like fields containing commas, quotes, or newlines), fgetcsv() handles these natively. If your data is simpler or requires custom processing, file() might be sufficient with manual parsing.
- Processing Needs: If you need to process or analyze each line of text beyond simple CSV parsing (like complex checks or multiple parsing passes), file() can be advantageous.